About Me

My photo
I live in the beautiful city of Portland, Oregon. I am a work at home mom and meeting planner, who loves what I do in every way. I think I get the best of both worlds; a little travel and some home time with my little chicklets. In my spare time I enjoy hosting parties, art, cooking, crafting, re-doing furniture, wogging, tennis and shopping. I am going through a journey that I wanted to share. I hope in some small way it helps you.

Monday, September 26, 2011

Free Giveaway!

Hello Friends!  Portobello Road is doing a giveaway!!!  It is my first giveaway so I am a bit excited!  I just want everyone out there to know that they too can be a crafter/baker/furniture painter pretty easily by reading some of the tips posted right here at this very blog! www.portobelloroadnw.blogspot.com

There's pure inspiration in every creation is our tag line around here.  Which is part of the Portobello Road song.  Does everyone know what movie that song comes from?  Yes, Bed knobs and Broomsticks!  If you are as old as I am you will know this movie, and I love this movie and that song!   Inspiration is all around us (mostly on Pinterest these days). So let's share what inspires us!

You may have as many entries as listed below (up to 3).  Good luck!
-One entry for commenting here, tell me what your favorite movie was growing up.
-One entry for liking the Portobello Road facebook page.
-One more entry for commenting on my facebook page of something that inspires you.

The winner will be chosen on September 30th and posted here.

The prize is a set of 3 of these darling fabric pumpkins!
These lucky little pumpkins will be shipped to you and am sure will love living in your beautiful home all during Fall.  I will also be posting the tutorial here later on this month.


Happy Crafting,
Christie


Sunday, September 25, 2011

Easy DIY Shutter project

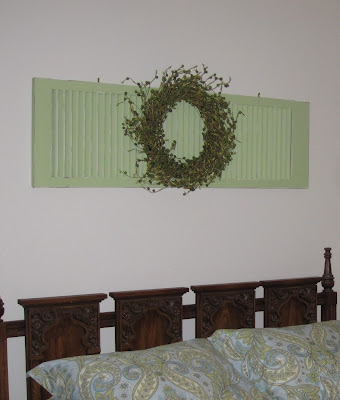
Recently I did a make-over of my mother-in-laws new apartment.  A little house on the river is what I like to call it.  She had some very good basics for our foundation, like this headboard (which I would secretly would like to get my hands on to paint and distress).  She just needed a some pop!

On a budget of course I headed over to the ReStore.  A great inexpensive resource for any home building project.  I personally like to get paint there, check out the furniture, knobs, and doors.  On this particular trip I was looking for a shutter made out of real wood.  Found one!


I dusted off the cobwebs and old leaves with a broom. And put my sander to it, just to smooth it down really. I knew this did not have to be perfect in fact I wanted it to look worn.  


Then I painted it with this lovely green oops paint and my paint sprayer.  After it dried, I put on just one coat of poly. I use Minwax water based.  Since it would be hanging on a wall, one coat would do. If it were a heavy use piece I would have put several coats on to get a good seal.   I found this wreath a garage sale and wha-la! 


Cost of project: Shutter $3, Paint $2, Wreath $4

Happy Crafting,
Christie

Saturday, September 24, 2011

October Craft Night...October 20th

I have finalized the crafts kits I will have available for our October craft night.  Which will most likely be on Thursday, October 20th.  Many of you signed up at the September craft night.  If you would like to switch to another craft, just comment below or email me.  The deadline for the Turkey craft kit will be a little earlier, because I need to order them and have them shipped from Utah.  Let's say October 5th.

If we have anyone new that would like to come to craft night, welcome!  Comment or email me of what you would like to order. 

All of the following craft kits come with everything you need to make them that evening.  Brushes, paint, Mod Podge, etc.

"Be Thankful" Plaque $8.00

Porch Pumpkins $20.00
Will be adding polka dots..see next picture.

"GIVE THANKS" $10 for kit
Current sign-ups deadline October 15th

Porch Pumpkins
Debbie
Alicia
Cheryl L.
Christie
Chelsea
Ellen
Kim
Bryn

"Be Thankful" Plaque
CeCe
Cheryl W.
Sarah
Karisa
Chelsea

"Give Thanks" Banner
Amy
Ellen

Garland & Turkey-cancelled

Boo Blocks...Tutorial

I have been hunting around for a cute Halloween decoration to go with my bats and subway art.  You can spell "BOO" or "EEK".  These turned out way cuter than I thought they would be!

You will need:
  • (3) blocks 2x6 cut into 6, 7, and 8 inch tall pieces.
  • Black Paint (or orange or white)
  • Wood letters ("BOO" or "EEK", I got mine at Michael's)
  • Glitter craft paint or you can use glitter and glue (orange, black or silver)
  • Paint for your letters (if you want orange glittery letters, paint an orange base first then the orange glitter paint)
  • Halloween scrapbook paper (3 different designs)
  • Mod Podge
  • Wood glue
  • Ribbon (at least 4 yards)
  • Sand Paper or power sander
  • Optional: If you paint your blocks white or orange you can distress with an ink pad or stain

Cut a 2x6 into three pieces 6, 7 and 8 inches tall. You will have left over wood. Sand edges if needed.  Paint them black.  You don't have to paint the bottom or all of the front, just most of it.  Distress wood if you want to with sand paper.

Choose your scrapbook paper and cut to fit front of blocks.  I cut my paper about a 1/2 inch smaller on each side than my wood.  Then paint your letters.  Painting a base color before you paint on your craft glitter or glitter and glue.  This will make it so you don't see the bare wood.

Mod Podge your paper to your wood.  Use a credit card or squeegee to smooth it out.  Then glue your letters to the front of the block.  Let dry at least 30-60 minutes before you put your ribbon on.

Wrap your ribbon around the edge from the bottom up. Tie a knot tightly.  If you want to do a bow, just tie a knot first then the bow.  I used an orange glitter ribbon from Michael's.

Enjoy your spooky blocks! 
Happy Halloween!!

  Linking up over at...               
                             

Spooky September Craft Night...

Last night was craft night and it was so much fun! We had the most people we have ever had, so we rented the clubhouse in our neighborhood. Good friend, good food, and spooky crafts!

Here are some girls making the fabric pumpkins.

Kaitlyn is busy making her yarn wreath.

This table was having too much fun making their Boo Blocks!

Kim's blocks turned out darling!  Or should I say scary..licious!
 I will be posting some of the tasty food recipes and directions from some of the crafts we did during craft night.  Stay tuned!

Thursday, September 22, 2011

Feeling Batty!

I have been searching for the perfect partner to go with the eighteen25 Halloween subway art I printed and framed this week. It is available to everyone at this link.  The picture was just a little lonely there on the wall all by itself. 
Last night at a church service auction I bid every single one of my 795 points on the cutest Halloween basket.  It was made by my very good friend Jessica Bills.  In the basket there was some yummy Halloween candy, two safety slap bracelets, a bag of stretchy spider web and the cutest picture frame with a "Keep Calm and Scare On" picture that she personally designed.  You can check out the cute sign here and her new Halloween subway art that you can download and print for free! 
What else was in the basket you ask? ...These bats!!!


I even put some outside to go with my boo wreath.  I heart my bats!  Bring on Halloween, now I just need to get going on our costumes...

Wednesday, September 14, 2011

Phone Table...a what?

Have you ever heard of a phone table?  I hadn't!  I mean I did grow up in a time where our phones were attached to the wall.  I mean we are talking old school yellow plastic phones.  No snazzy silver cordless phones, not even cell phones were in possession yet.  When rotary phones were in play, they used to put them on these tables.  The phone book went in the little cubby.  My sister picked up this antique for me at a local garage sale.  Which in my opinion is the best place to find furniture that are waiting for make-overs.  It's cheap and usually people are desperate to not bring the item back in their house.

I don't know why I am failing so bad at the before pictures, just think of a yellowish brown 70's colored wood.  It was actually way uglier than the top color that has been sanded down here.  But I put back the seat so you could see the lovely color it was before.  It almost matches my blog...hmmm, note to self maybe change blog design.

It was a pretty easy project.  First I unscrewed the seat and put it aside.  Then, I just sanded down the top because I knew I wanted to stain it.  Taped it off.  I cleaned it with a baby wipe because I was out of tack cloths (ideal).  Got out my HVLP Graco paint sprayer which you can find at your local Lowes.  Although this project could have easily been done with a plain old paint brush.  I painted it with a $5 a gallon oops paint which has actually become quite handy for me because it is a white premium paint and primer combo.  Just takes out a step for me.  Loving that!


A sprayed with 2 coats of white. I distressed it lightly with my electric sander because its quick, but you can use a sanding block.  I like the 3M medium 100 grit.  I then chose my stain for the top.  I went with Minwax Rosewood.  Again clean off with a tack cloth before you stain.  I find applying stain with a foam brush works best.  You can really control where it goes.  Always have a rag nearby for wiping.  I let it dry for about 24 hours before sealing it. 

Then put a seal on the whole thing.  Sometimes I spray on poly, not this time.  I stained the top so I chose a wipe on poly for that and then I used a water based poly for the top.  Anything painted white should be sealed with a water based poly.  Otherwise it might yellow.  I prefer Minwax Water-Based Polycrylic.  The blue can :)  I painted on two coats. The top with the wipe on, three coats.


Let it dry, read the can but usually a few hours, longer before it is actually used.  I then recovered the seat with a damask gold upholstery fabric.  I am not in love with the fabric, I think I might change it to a light aqua.  But this is it for now.  When re-covering something a good rule of thumb is to take off the existing fabric, in my case, pleather and trace the new fabric with the same pattern.  I was lazy and just eyeballed it.  But it turned out pretty good, don't cha think?


I changed the seat fabric, I just wasn't feeling the
gold damask with the cherry top. Cuter now!


Featured on:

Furniture Feature Fridays

Hard to sell Bassinet...

I found this baby at goodwill and snatch it up so fast.  I think it is my favorite find ever!  And I have found some pretty cool things.  My husband said sell it, even though I wanted to keep it for our next baby (sometime in the future).  I guess the vagueness of keeping this in our garage for who knows how long did not attract him.  But it is finished now and I am swept away with how pretty it turned out.  So sorry I don't have any before pictures.  Just think plain old brown smelly wicker.  Nothing special, but I saw the potential.

See....
Sprayed white paint and primer combo.


Memory foam pad that I had left over.  Cover with invisible zipper so you can take off and wash.
I want.

Monday, September 12, 2011

DIY craft...Halloween Wreath

This is a super easy craft I wanted to share in case you have some spare time on your hands.  Here is what you need:

(2) Yards of black or orange tulle
(1) Embroidery hoop (I think mine is 9 inch)
(1-2) Yards of black or orange ribbon
Scissors or rotary cutter


Cut your tulle in 3inch foot long strips.  I folded the tulle and then cut it into strips.
Then just start tying!  Super easy to do while your watching a movie or your favorite TV show. 
If you get enough ribbon you can just loop it and hang on your door.  I tied a bow and then glued it on.  I also had a glitter boo, I looped onto the bow.

I think it took me maybe an hour and look how cute.


Happy Crafting!

~Christie

Linking up to:
Making

Saturday, September 10, 2011

Craft Night ..Fabric for the pumpkins

We have craft night coming up on Friday September 23rd.  Come anytime after 6:00p.  Some people like to come early and some a little later, does not matter, we will be here crafting the night away!

Just wanted to post the fabric I got for those of you wanting to make the fabric pumpkins.  Bring any embellishments you may want, buttons, dollies, raffia??? 
If you have your own fabric, just drop it off to me ahead of time, so I can cut and sew it to get you started. 

Orange Crinkle and Fall Leaves

This is dark brown (not black)

Orange Pinstripe
Each of you will get to make 3 pumpkins, but if there is extra (probably will be) then you can make more for $3 each.  Let me know if you have any questions.

Wednesday, September 7, 2011

Thanksgiving ideas and Super Saturday...

Next month we have something call Super Saturday in our Church.  It is a day that the women of our church get together and craft!!!  I think it is one of my favorite days during the year.  It is Saturday, October 15th from 9am to 1pm.  Lunch is included.  The crafts that we are doing will be posted here soon. If you are interested in coming, please let me know soon.  I think the deadline is October 1st.

So I am in search of some super cute Thanksgiving and Christmas crafts.  I am thinking our craft night next month will be around October 21st if that works for everyone.
This is a project I just found (from Maria over at You Craft Me Up) and am absolutely in love with it.  But maybe it is just me?

Porch Pumpkins $TBD
Is it too Halloweeny? 
I also found this Garland, it could be done as a wreath as well. 

Thanksgiving Garland $TBD
I love this Burlap Banner.  This one is suppose to say Happy Halloween.  But we could do a Give Thanks or Happy Thanksgiving.

Thanksgiving Banner $TBD

And I just found these super cute kits from the Wood Connection.

Turkey Door Hanger (or can put on a block) $TBD

Pilgrims $TBD

Cast your votes now...or send me some ideas!

Bye for now,
Christie

Tuesday, September 6, 2011

September Crafts...Sept 23rd

Hi Ladies!

Welcome to my new blog, Portobello Road! 
http://portobelloroadnw.blogspot.com/

I thought it might be a little easier to organize things on here. You can see who is coming, what crafts were doing and the costs.  You can also easily forward the link to your friends, and then they can comment just like everyone else. 

In the future, I will have you comment here on if you want to attend and what craft you would like to do.  If I don't already have your information for September, please comment now.  The deadline is September 16th.

This month we will be crafting the following...


Boo Blocks $12.00
(includes: cut wood, paper, wooden letters, ribbon, paint & all supplies)

Fabric Pumpkins $12.00 for 3 or $4.00 per pumpkin
(includes: prepared autumn fabric, yarn, stuffing & all supplies) 

Orange Wood Pumpkins $12.00
(will be same cuts as boo blocks, includes all supplies)

I also still have supplies for our cute yarn wreaths...

Yarn Wreaths $10.00 (includes wreath, yarn, felt, ribbon & all supplies)

Here is the list of who I have coming:

Kim-Boo
Sarah-Boo
Cheryl (Sarah's friend)-Boo
Cheryl L.-Boo
Stephanie-Boo
Jessica-Boo
Karie-Wreath
Kaitlyn-Wreath
Amy-Fabric Pumpkins
Michah-Fabric Pumpkins
Claudia-Fabric Pumpkins
Adrianne-Fabric Pumpkins
Ellen-Fabric Pumpkins

I know I am missing someone?

Coming soon...Thanksgiving and Christmas crafts!  Let me know if you have any ideas!